Getting started
With FBP you mostly connect the the output of a component (event) with the functions of an ohter element.
Connecting things
We have a button and an elements which we want to hide after the button is clicked.

<template>
  <button @-click="--hideClicked">hide</button>
  <element-to-hide ƒ-hide="--hideClicked">First element to hide</element-to-hide>
</template>
This doesnt look very impressive in the first moment. But like you can see, there is no scripting involved and there are no id’s assigned to the components. This will be more useful if you have more then 2 components.
Note
The ƒ-hide method from element-to-hide will be called with event.detail from the click event as an argument.
More on this you can read in section passing data
Multiple targets
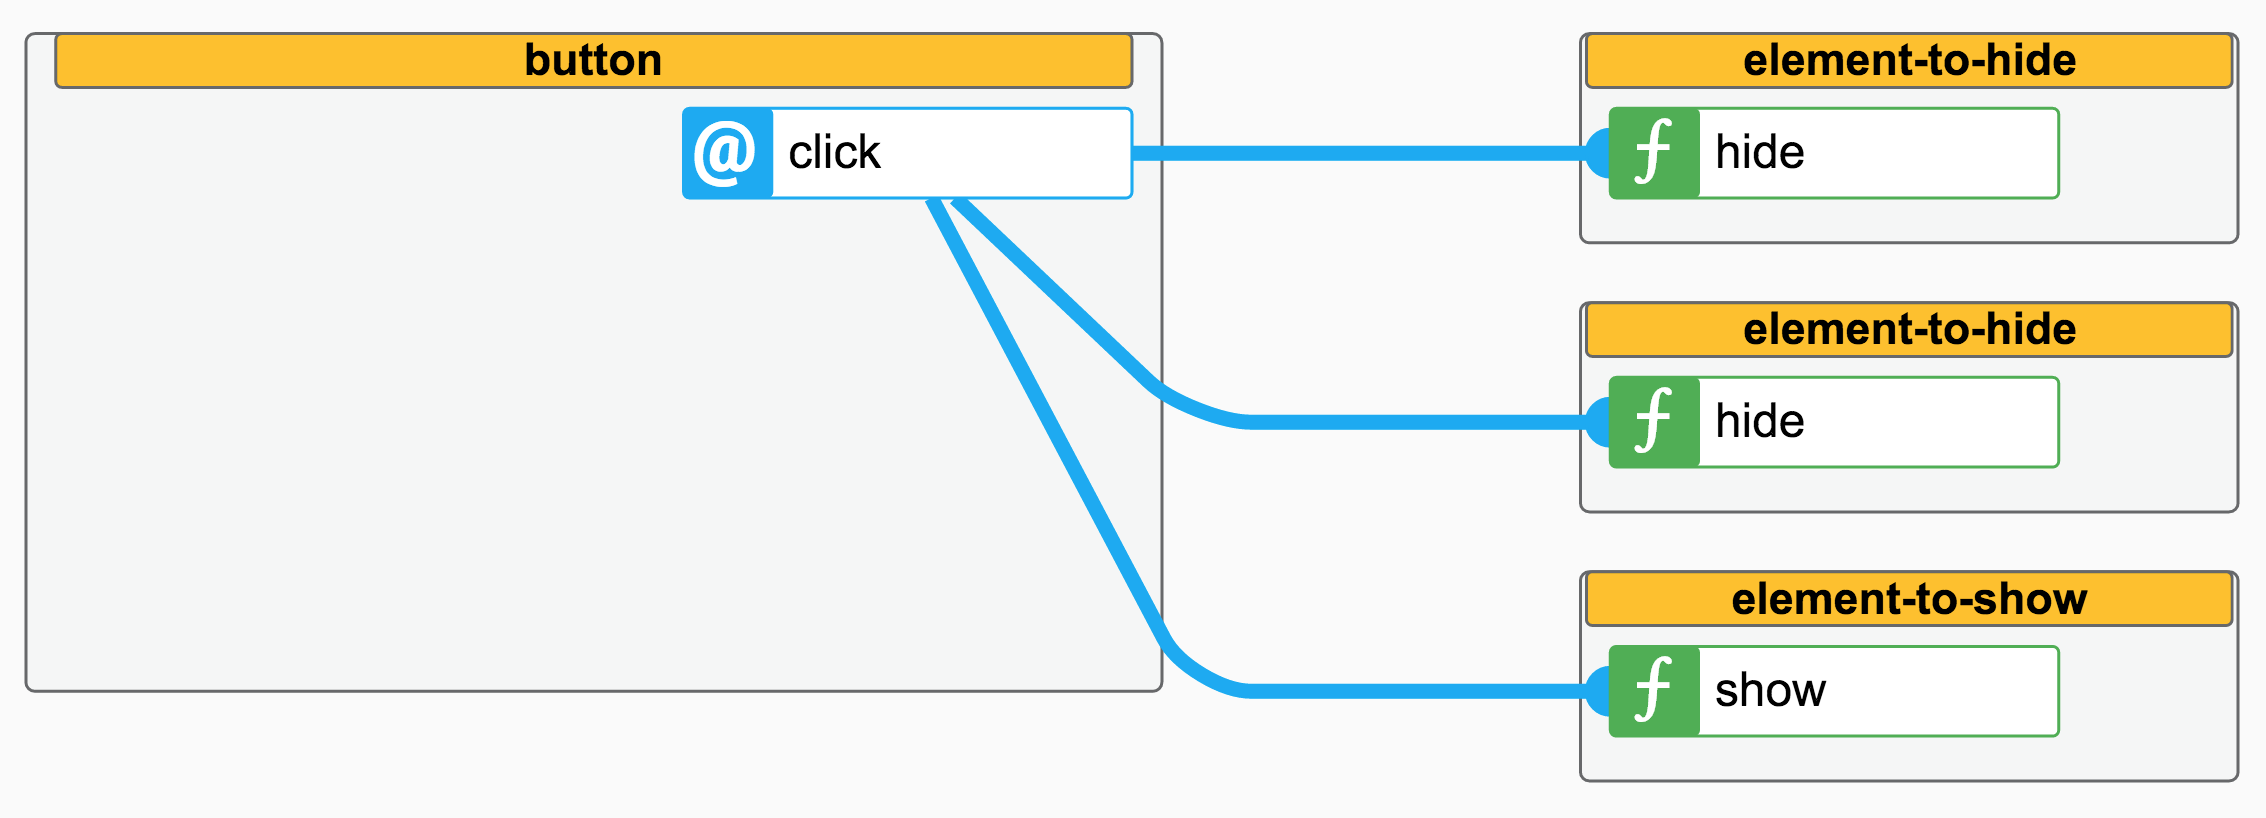
A wire can have multiple targets. The –hideClicked wire from above can trigger multiple elements if you want.

<template>
  <button @-click="--hideClicked">hide</button>
  <element-to-hide ƒ-hide="--hideClicked">element to hide</element-to-hide>
  <element-to-hide ƒ-hide="--hideClicked">other element to hide</element-to-hide>
  <element-to-show ƒ-show="--hideClicked">other element to hide</element-to-show>
</template>
if you press the button, all elements which are connected to the wire will trigger the defined function. In this example the first to will call the hide and the third element will call the show function.
Multiple sources
A wire can also have multiple sources.

<template>
  <button @-click="--hideClicked">hide</button>
  <element-to-hide ƒ-hide="--hideClicked">element to hide</element-to-hide>
  <button @-click="--hideClicked">other hide</button>
</template>
It doesn’t matter if you press the first or the second hide button. Both will trigger the wire –hideClicked.
Multiple sources and targets
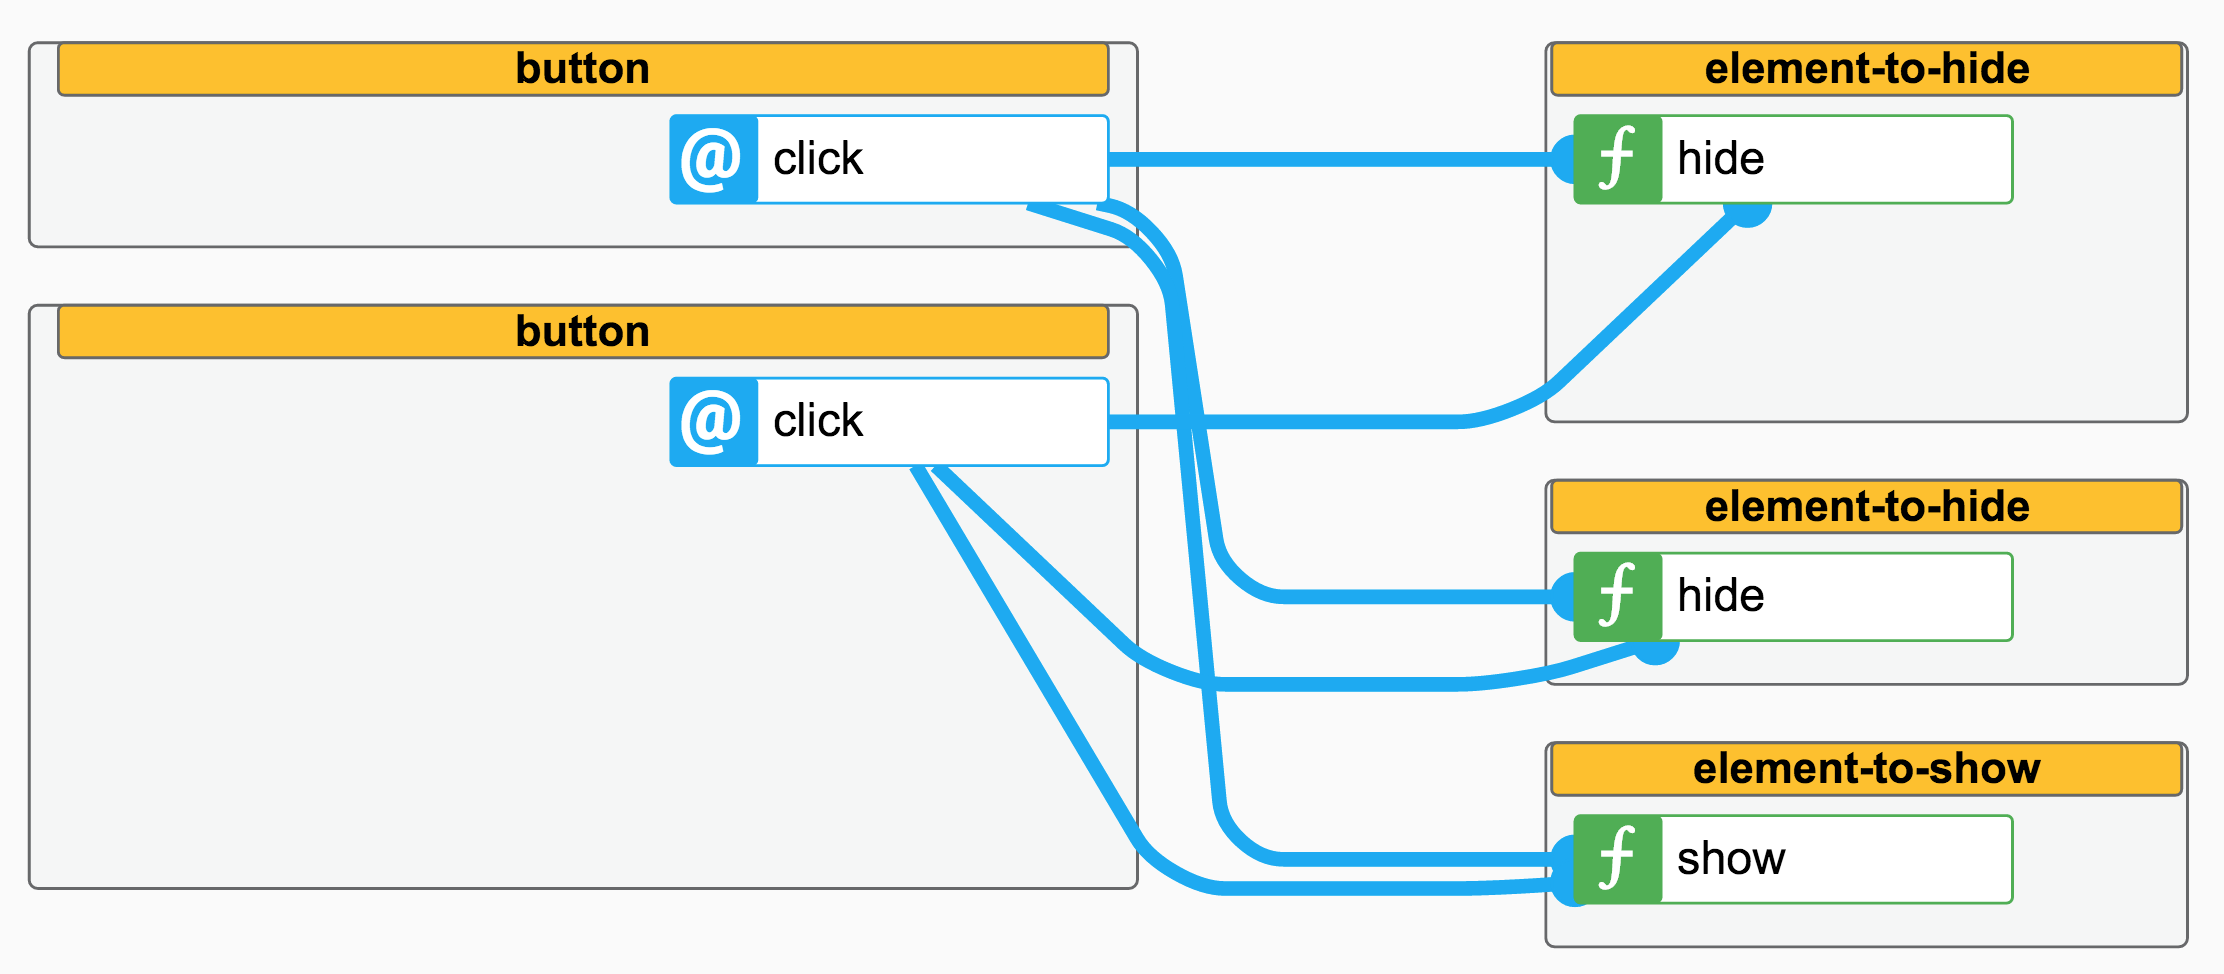
A wire can also have multiple sources and targets.

  <template>
    <button @-click="--hideClicked">hide</button>
    <element-to-hide ƒ-hide="--hideClicked">element to hide</element-to-hide>
    <element-to-hide ƒ-hide="--hideClicked">other element to hide</element-to-hide>
    <element-to-show ƒ-show="--hideClicked">other element to hide</element-to-show>
    <button @-click="--hideClicked">other hide</button>
  </template>
Multiple wires from source
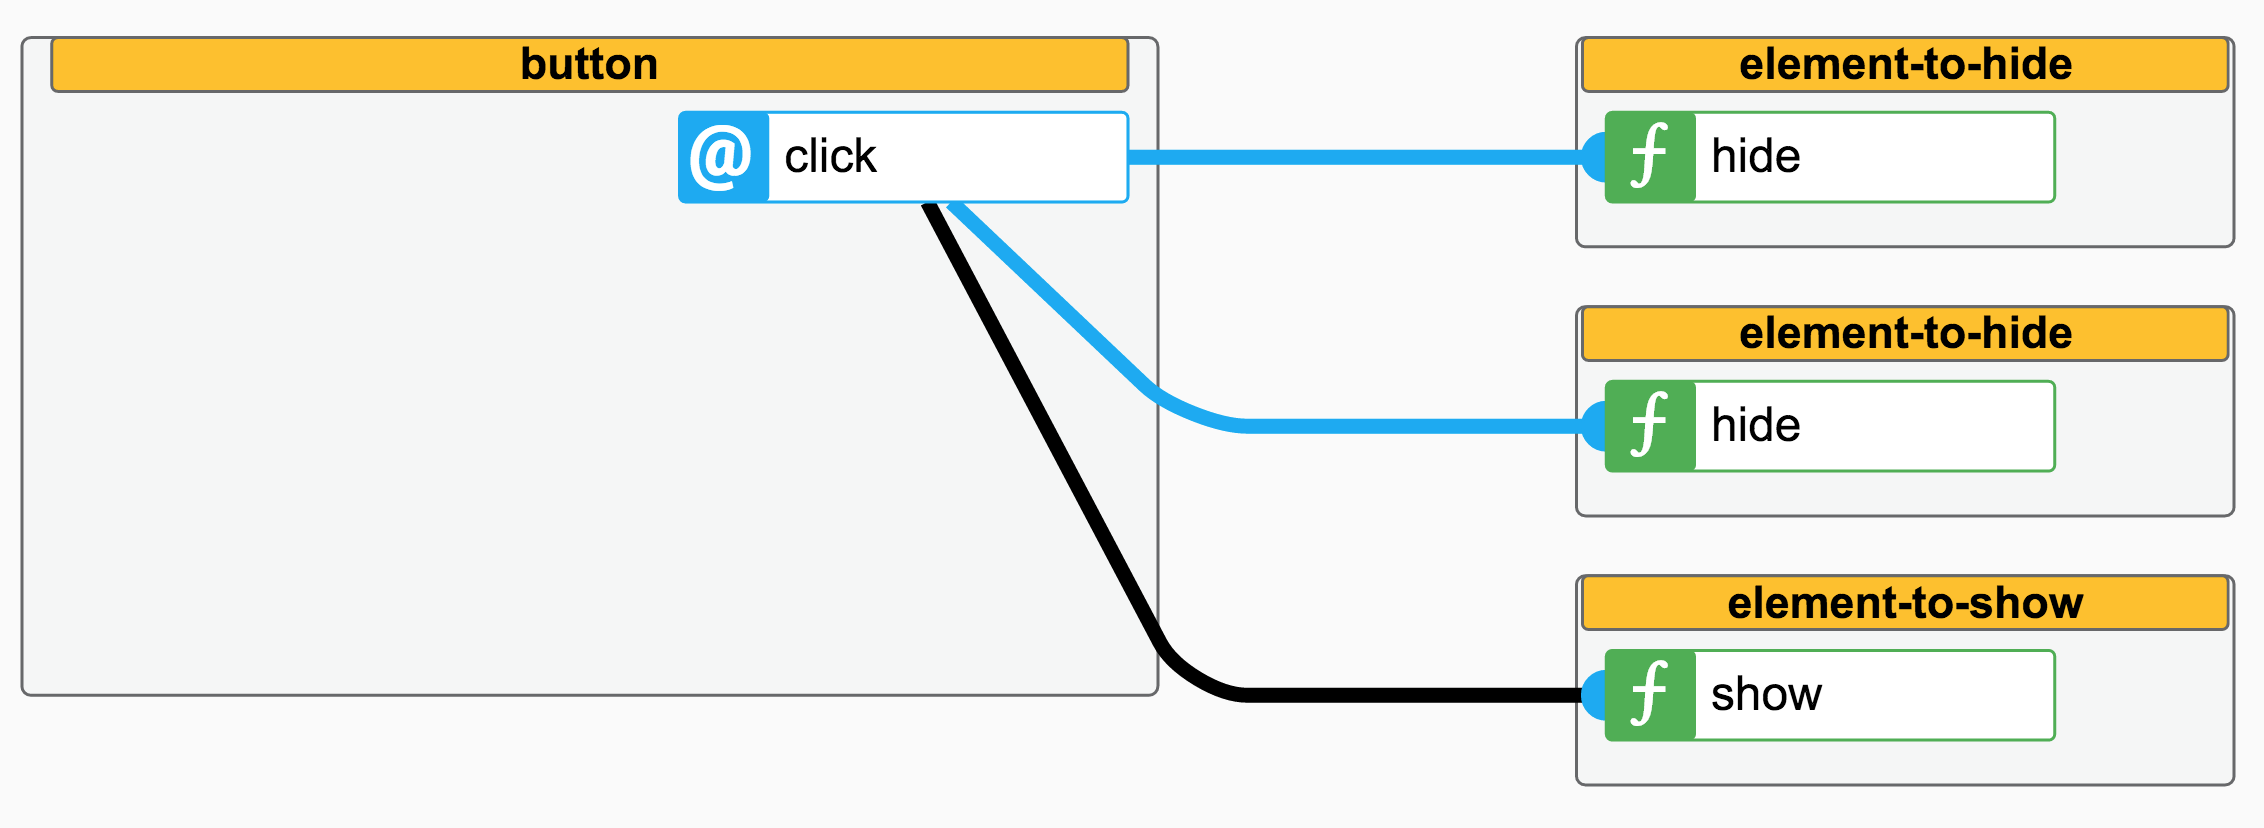
You can trigger multiple wires from one source by comma separating them.
 the black wire is –otherIntention
<template>
  <button @-click="--hideClicked,--otherIntention">hide</button>
  <element-to-hide ƒ-hide="--hideClicked">element to hide</element-to-hide>
  <element-to-hide ƒ-hide="--hideClicked">other element to hide</element-to-hide>
  <element-to-show ƒ-show="--otherIntention"> element to show</element-to-show>
</template>
If you press the button, it will trigger the –hideClicked and –otherIntention wire (in black).
Multiple wires to target
You can receive from multiple wires by comma separating them.

<template>
  <button @-click="--hideClicked">hide</button>
  <placeholder-element ƒ-hide="--hideClicked,--contentLoaded">element to hide</placeholder-element>
  <element-to-hide ƒ-hide="--hideClicked">other element to hide</element-to-hide>
  <main-content @-ready="--contentLoaded" data="[[_content]]"></main-content>
</template>
The hide function of the placeholder-element will be triggered when –hideClicked or –contentLoaded will be fired.
Passing data
Normally the event.detail is passed to the function you wire. But sometimes you want an event as trigger and another property then event.detail as payload. You have several ways to accomplish this task.
inject the property at the wire source
   <paper-button @-tap="--wireWithProerty(_myProp)"> Press this </paper-button>
   <other-component ƒ-demo="--wireWithProerty"></other-component>
_myProp is a normal polymer property.
using a component to replace event.detail with a property

   <paper-button @-tap="--buttonPressed"> Press this </paper-button>
   <replace-detail data="[[_myProp]]" ƒ-in="--buttonPressed" @-out="--wireWithProerty"></replace-detail>
   <other-component ƒ-demo="--wireWithProerty"></other-component>
Send the raw event instead of event.detail
Note
This is only implemented in the mixin.html for Polymer 2+
Sometimes the e.detail is not useful or you need the event itself (for a e.preventDefault();).
With an asterix as argument --wireName(*) you will send the raw event.
Multiple arguments
In some rare conditions, the functions you want to call, need more then one argument. In this case you can pass in an array of arguments to the function.
  ...
   <multiply-values ƒ-calculate="--wireWithArray" result="{{_result}}"></multiply-values>
   <paper-button @-tap="--wireWithArray(_values)"> calculate </paper-button>
  ...
  ...
  ,properties:{
      _values:{
      type:Array,
      value:[3,2]
      }
  }
Handling responses from functions
When you wire a ƒ-function, a non bubbling event ƒ-function with the response value in event.detail will be fired. There is no difference to another fired event. You can fire another event, which eventually bubbles, store the response to a property, wire it,…
You can receive and rewire the response from a function with @-ƒ-functionname=“…””.
  ...
   <paper-button @-tap="--wireWithArray(_values)"> calculate </paper-button>

   <multiply-values ƒ-calculate="--wireWithArray" @-ƒ-calculate="--calculated"></multiply-values>
   <multiply-values ƒ-calculate="--wireWithArray" @-ƒ-calculate="((_result))"></multiply-values>
  ...
  ...
  ,properties:{
      _values:{
      type:Array,
      value:[3,2]
      },
      _result:{
      type:Number
      }
  }
When you press the button, both multiply-values.calculate functions are called. The first one will trigger the wire –calculated, the second one will write the response to the property _result.
Trigger a wire imperatively (from javascript)
In some rare conditions you have to trigger a wire from the sources. If you have applied the mixin, you can call the _FBPTriggerWire method.
ready(){
  super.ready();
  this._FBPTriggerWire('--wireName', this.dataYouWantToPass);
}
*this will trigger the wire –wireName on all components who receive this wire i.e. <load-data ƒ-start="--wireName"></load-data>).*